Safe Use of a Saw
Activity Overview
Difficulty: Intermediate
Time: 30–45 minutes
Location: Designated outdoor woodcraft area
Best for: Scouts and Explorers
Skills: Tool safety, woodcraft, cutting techniques, concentration, risk management
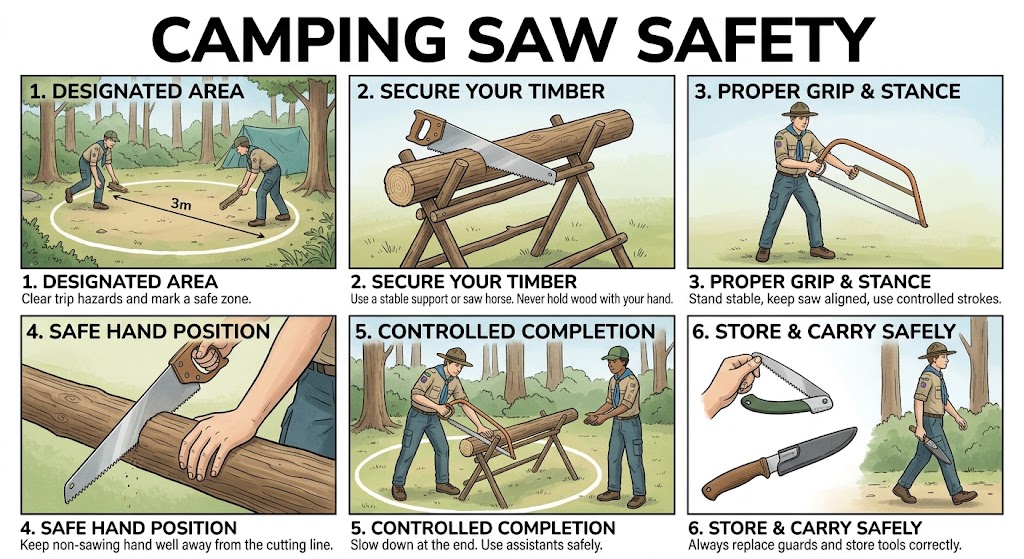
A saw should be used in a clear, controlled area with the timber securely supported. Check the saw before use, keep your free hand away from the blade, use steady controlled strokes, and make sure nobody is within the path of the saw or the timber.
A saw is generally easier to control than a chopping tool, but it can still cause serious cuts if handled carelessly.
What You’ll Learn
You will learn how to prepare a safe sawing area, inspect and handle a saw correctly, secure timber, make controlled cuts and safely carry and store the tool.
These skills are useful for Scout woodcraft, campcraft and pioneering activities where cutting timber is appropriate.
🟡 SAFETY – MODERATE RISK
A saw has sharp teeth and can cause significant cuts. The activity should be risk assessed and supervised appropriately, with the supervising adult satisfied that participants understand the correct technique.
Never use a saw while running, joking around, distracted or standing in an unstable position. Use the correct type and size of saw for the job.
Keep other people clear of the working area. Nobody should reach towards the blade while another person is cutting.
Wear sturdy footwear and suitable outdoor clothing. Avoid loose clothing, cords or anything else that could become caught on the saw or timber.
Equipment
You will need a suitable hand saw, timber appropriate for the activity and a stable support such as a saw horse, chopping block or other approved arrangement.
A blade guard or protective cover should be used when the saw is being transported or stored, where appropriate.
Prerequisites
Before using a saw, learn the correct technique from a competent adult. You should understand how to hold the saw, position the timber, keep your hands away from the cutting line and stop safely.
The supervising leader should establish the working area and demonstrate the technique before participants begin.
Instructions
1. Prepare the working area
Choose firm, level ground with enough space to work safely.
Remove bags, ropes, branches and other trip hazards. Make sure there is a clear area around the person using the saw.
Position your timber support so that it cannot easily move or tip.
2. Inspect the saw
Check that the handle is secure and undamaged and that the blade is properly attached.
Look for damaged, bent or loose teeth. Do not use a saw that appears unsafe.
Tell the supervising leader if you find a problem rather than attempting an unfamiliar repair yourself.
3. Secure the timber
Place the timber firmly on the support.
The piece being cut should not roll or slide while you are sawing. Keep the part being cut supported appropriately so that it does not suddenly fall or pinch the blade.
Never hold timber immediately in front of the saw blade with your hand.
4. Mark the cut
Clearly identify where the cut needs to be made.
Check that the blade has a clear path through the timber and that nothing underneath or beyond the timber could be damaged.
Make sure the offcut will not fall onto your feet or another person when the cut is completed.
5. Start the cut carefully
Place the saw on the marked line and begin with short, gentle strokes.
Once a groove has been established, use longer, controlled strokes while keeping the saw aligned with the cut.
Do not force the blade. Let the teeth do the work.
6. Keep your free hand safe
Keep the hand that is not holding the saw well away from the blade and its path.
Never place a finger on the far side of the timber to guide the saw. If the saw slips through the cut, your hand could be injured.
If additional support is needed, stop and reposition the timber rather than putting your hand close to the blade.
7. Maintain control
Keep both feet stable and maintain a comfortable stance.
Use smooth movements rather than fast, aggressive strokes. Keep watching the cutting line and be prepared for the timber to move as the cut gets deeper.
If the saw starts binding, stop and work out why rather than forcing it.
8. Complete the cut carefully
As the saw approaches the end of the timber, reduce the pressure and slow down.
Support the timber and offcut appropriately so that the pieces do not suddenly drop or swing when the cut separates.
Do not try to catch a falling piece of timber while still holding the saw.
9. Carry the saw safely
When moving with a saw, keep the blade controlled and protected where possible.
Carry it with the teeth facing away from your body and other people. Never run with a saw or wave it around.
If you are moving through a group, make sure the saw is secure before walking.
10. Finish and store the saw
When finished, clear away timber offcuts and return the work area to a safe condition.
Clean the saw if necessary and fit its protective cover where applicable.
Return it to its designated storage place rather than leaving it on the ground, in long grass or underneath equipment.
Final Tip
Let the saw do the work. A steady rhythm and secure timber will produce a cleaner cut while giving you much better control. If you find yourself forcing the saw or struggling to keep it straight, stop, reset the timber and start again.
🔒Ready to test your survival skills?
Join Survival Guides UK for free, complete challenges, earn badges and increase your Survival Level.
JOIN FREE →
CRAIG BURR
FOUNDER · SURVIVAL GUIDES UK
I'm Craig, the person behind Survival Guides UK. I created SGUK because I wanted somewhere people could learn real outdoor skills in a practical, straightforward way — from lighting a fire and tying knots to navigation, campcraft and everything in between.
You can read more about the story behind SGUK here as well as our approach here.