How to Build a Debris Shelter
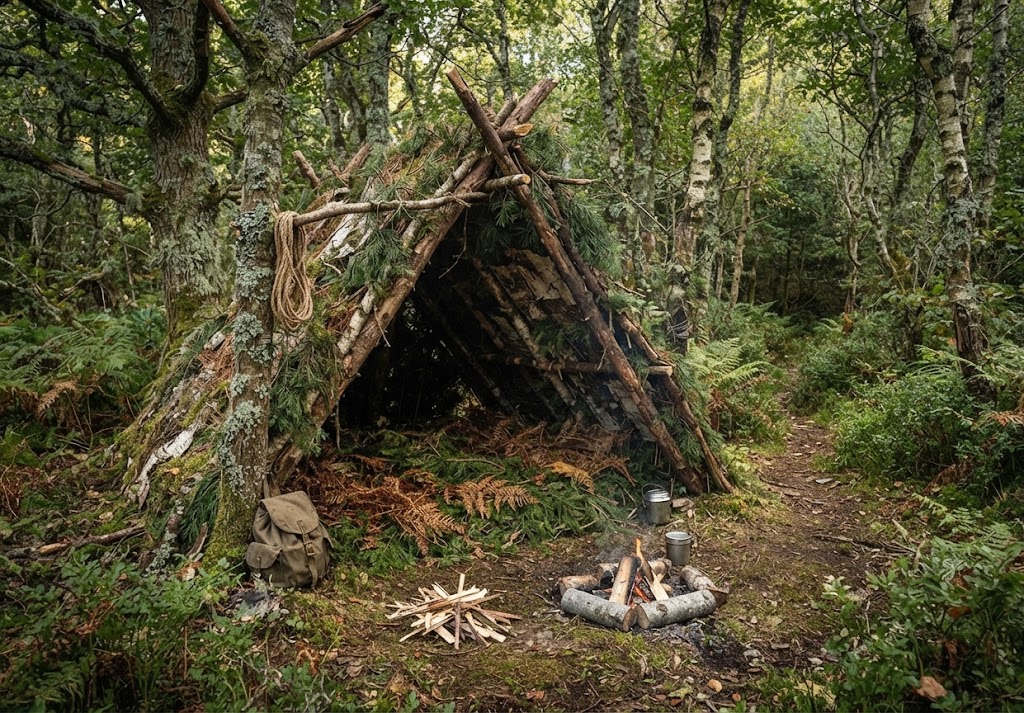
A debris shelter is a simple woodland shelter made mainly from natural materials such as branches, leaves, moss and other fallen vegetation. It is one of the more interesting shelter-building skills to practise because the materials are all around you, but making a shelter that actually keeps you warm and reasonably dry takes more than simply piling leaves over a frame. Get it right, and this kind of shelter can be absolutely amazing and keeping you warm and sheltered from the elements.
The most important part is the insulating layer. A thin covering of leaves might look like a shelter, but it will do very little to keep the warmth in. A properly built debris shelter uses a strong frame and a thick layer of dry natural material to create a barrier between you and the weather.
Choose the Right Site
It all starts by choosing a suitable place to build. You want to look for firm, reasonably level ground with plenty of fallen material nearby, but you also don’t want to choose a site simply because there are lots of branches around.
Check above you for dead branches that could fall, and avoid areas that are low enough to collect water. Stay away from unstable slopes, river edges and places where water could run through after heavy rain.
If you’re practising the skill rather than building an emergency shelter, choose a location where you can work without damaging living plants or disturbing wildlife.
Keep the Shelter Small
A debris shelter works best when it is only slightly larger than the person using it. You don’t need to build anything huge, even though it appears more comfortable.
This might seem strange when you’re building it, because a larger shelter feels more comfortable while you’re working. However, the smaller the space inside, the easier it is to warm with body heat. A large shelter also requires much more material to create a sufficiently thick insulating layer.
Think of it as creating a small space that you can actually warm rather than building a large room.
Build the Main Ridge
There are many different designs but the simplest design uses a long, sturdy branch as the main ridge of the shelter.
Rest one end securely against a tree, a suitable stump or another strong support. The ridge should be high enough for you to get inside but low enough to keep the shelter compact.
Make sure the main ridge is stable before adding anything else. If it moves easily when you push against it, strengthen the support rather than continuing with the shelter as it is surprising how much weight the top layers will add.
Add the Side Ribs
Lean smaller branches against both sides of the ridge to create the basic frame.
Space them fairly close together so that there aren’t large gaps in the structure. They don’t need to be perfectly straight or identical; the important thing is that they form a reasonably strong framework capable of supporting the covering layers.
Keep checking the structure as you work. A shelter that looks solid from one side can have a surprisingly weak section on the other.
Strengthen the Frame
Once the main ribs are in place, add smaller branches across them if necessary.
These cross pieces help stop the covering material from falling through the frame and make it easier to build up a thick layer. You are effectively creating a basket-like framework that can support the debris.
Don’t use rotten branches simply because they are easy to break. A weak frame can collapse once you start adding weight.
Gather Your Covering Material
Now comes the part that usually takes the most time: collecting enough debris to turn your frame into a proper shelter.
Dry leaves are particularly useful because they trap air between them, providing insulation. Dry grass, bracken and other fallen vegetation can also be useful depending on what is available.
Collect material that has already fallen rather than stripping living plants. You will need much more than you might expect, so gather it into piles near the shelter before you start covering the frame.
Build a Thick Layer
Start placing the material over the frame from the bottom upwards.
Keep adding layers until the entire outside of the shelter is covered. The covering needs to be thick enough to block gaps and trap air inside the shelter.
This is one of the biggest differences between a useful debris shelter and one that simply looks the part. If you can easily see the framework through the covering, you probably need considerably more material.
Check for Gaps
Once you have built up the main layer, walk around the shelter and look carefully for thin spots.
Pay particular attention to the sides and the area around the entrance. Wind can find surprisingly small gaps, and rain can work its way through areas where the covering is too thin.
Add more material wherever you can see daylight through the shelter or where the covering looks noticeably thinner than the surrounding area.
Create an Insulating Floor
The ground can take a huge amount of heat from your body, so don’t concentrate entirely on the roof.
Build up a thick layer of dry leaves or other suitable natural material inside the shelter. You want to create a barrier between yourself and the cold ground rather than lying directly on soil.
The floor should be thick enough to compress without disappearing completely underneath you.
Keep the Entrance Small
Leave an entrance large enough for you to get in and out, but avoid creating a huge opening.
A smaller entrance helps reduce draughts and makes it easier to retain warmth inside the shelter. You can use loose natural material to partly cover the entrance when the shelter is not being used, provided you can still get out easily.
Never block yourself into a shelter completely.
Check the Shelter Before Using It
Before getting inside, inspect the entire structure.
Check that the ridge is secure, the side branches are stable and the covering isn’t likely to collapse onto you. Look for sharp branches sticking into the sleeping area and remove anything that could cause an injury.
If the shelter moves significantly when you put weight against it, strengthen it before using it.
Safety When Building a Debris Shelter
There are several things to think about when building a shelter from natural materials. Dead branches can be unstable, some plants can cause skin irritation and insects or other wildlife may be living underneath fallen material.
Wear suitable clothing and gloves if you are working with rough branches, and don’t reach blindly into piles of vegetation. Avoid disturbing nests, dens or other signs of wildlife.
Never build underneath dead trees or large dead branches, and don’t use a debris shelter near a fire. Dry leaves and branches can ignite very easily.
If you’re practising the skill with children, build the shelter as a supervised activity rather than allowing them to collect and handle unknown plants or heavy branches on their own.
Don’t Destroy the Woodland to Build One
A debris shelter is supposed to use material that is already available on the ground.
You don’t need to be cutting down young trees or stripping living branches to make one. Fallen material is usually enough if you choose a suitable site and take the time to collect plenty of it.
When you’re finished, dismantle the shelter where appropriate and leave the area as close as possible to how you found it.
Practise Before You Need the Skill
The best way to understand a debris shelter is to build one when you don’t actually need it.
You’ll quickly discover how much material is required, how difficult it is to make a strong frame and how important insulation is. You can also experiment with different sizes and shapes without the pressure of dealing with bad weather.
Once you’ve built one yourself, you’ll have a much better understanding of how natural materials can be used to create a surprisingly effective shelter.
🔒Ready to test your survival skills?
Join Survival Guides UK for free, complete challenges, earn badges and increase your Survival Level.
JOIN FREE →
CRAIG BURR
FOUNDER · SURVIVAL GUIDES UK
I'm Craig, the person behind Survival Guides UK. I created SGUK because I wanted somewhere people could learn real outdoor skills in a practical, straightforward way — from lighting a fire and tying knots to navigation, campcraft and everything in between.
You can read more about the story behind SGUK here as well as our approach here.