
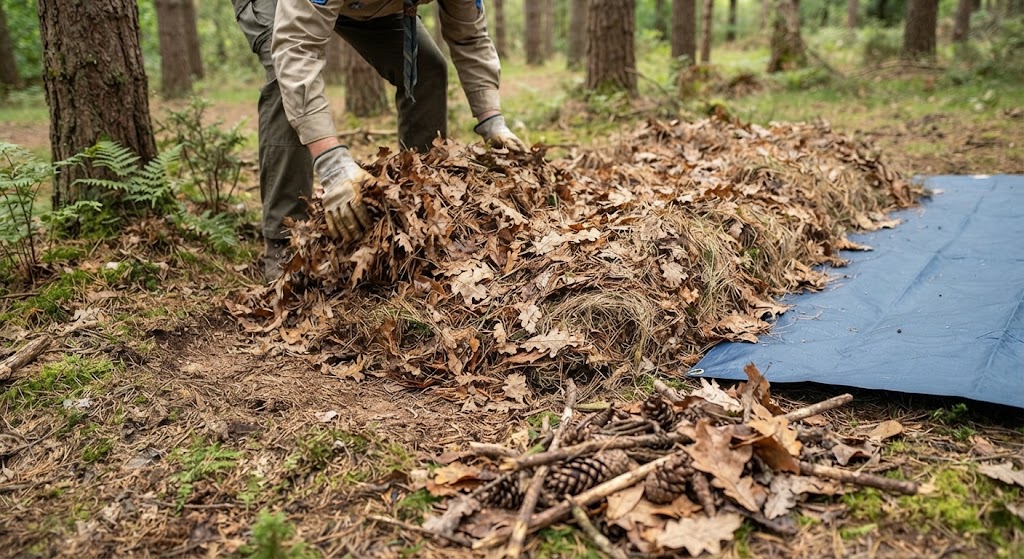
Improvised Ground Insulation
Activity Overview
Difficulty: Intermediate
Time: 30–45 minutes
Location: Suitable campsite or woodland camping area
Best for: Scouts and Explorers
Skills: Campcraft, survival skills, insulation, resourcefulness, outdoor safety
Improvised ground insulation is a way of reducing heat loss between your body and the ground when you do not have enough conventional sleeping equipment.
The ground can draw heat away from the body surprisingly quickly, particularly when it is cold, damp or wet. Building an insulating layer underneath your sleeping position can make a significant difference to comfort and can help reduce the risk of becoming cold during an overnight activity.
Suitable dry materials can include leaves, bracken, dry grass, pine needles and other loose vegetation, where their use is permitted. In a normal camping situation, however, a proper sleeping mat should always be preferred.
The aim is to create a thick, dry layer containing plenty of trapped air between you and the ground.
What You’ll Learn
You’ll learn how ground insulation works and why getting yourself off the cold ground is an important part of staying warm outdoors.
You’ll also learn how to select suitable materials, prepare an insulating layer and combine improvised materials with normal camping equipment when necessary.
This is a useful Scout survival skill because it encourages you to make effective use of the resources available rather than assuming that a piece of equipment is the only solution.
🟢 SAFETY – LOW RISK
Only collect natural materials where you have permission to do so, and avoid damaging living plants or sensitive habitats. Do not use materials that are contaminated, mouldy, heavily decomposed or likely to contain sharp objects.
Check the area carefully before lying down. Remove stones, sticks, thorns and other objects that could cause injury.
Never collect or use vegetation that you cannot confidently identify as safe to handle. Avoid plants that may cause skin irritation.
Improvised insulation should not be treated as a replacement for suitable sleeping equipment in cold conditions. If someone is becoming cold, wet or showing signs of hypothermia, stop the activity and follow the appropriate emergency procedure rather than relying on additional vegetation for warmth.
Equipment
You can use a sleeping mat or other normal groundsheet if available, supplemented with suitable dry natural materials.
For a fully improvised setup, suitable dry vegetation such as leaves, grass or bracken can provide an insulating layer.
A groundsheet or waterproof material can also help separate the insulation from damp ground, while a sleeping bag or suitable bedding provides the main layer of insulation around the body.
Prerequisites
Scouts should understand basic camping and personal safety.
They should know how to recognise cold conditions and understand that staying dry and insulating yourself from the ground are important parts of maintaining body temperature.
They should also understand the importance of leaving the environment as they found it when collecting or using natural materials.
Instructions
1. Choose your sleeping area
Find a suitable area of firm, reasonably level ground.
Avoid hollows where rainwater could collect and areas with obvious signs of flooding, unstable ground or excessive exposure to wind.
2. Check the ground
Before building the insulation, carefully inspect the area.
Remove obvious stones, sticks, pine cones and other objects that could become uncomfortable or cause injury.
3. Collect suitable materials
Look for dry, loose materials that can trap air.
Dry leaves, grass and similar vegetation can work well because their structure creates small pockets of air.
Only collect materials that you are permitted to use and avoid stripping living vegetation unnecessarily.
4. Build a thick layer
Spread the material across the sleeping area.
Build it substantially thicker than you might initially think is necessary. As you lie down, the material will compress, reducing its insulating ability.
5. Keep it dry
Damp materials are generally much less effective as insulation.
Keep the upper surface as dry as possible and use a groundsheet or other waterproof layer where available to provide separation from wet ground.
6. Create an even surface
Spread the material evenly so there are no large gaps or thin areas.
Pay particular attention to the areas beneath your hips, shoulders and torso, where body weight will compress the insulation most.
7. Test the insulation
Carefully lie down on the prepared area.
Check for uncomfortable objects or areas where the insulation has compressed too much. Add more material where necessary.
8. Add your normal bedding
If you have a sleeping mat, place it over the improvised insulation.
Your sleeping bag or other bedding should then be used as normal. The improvised layer works mainly to reduce heat loss into the ground.
9. Check during the night
If the insulation becomes compressed or damp, adjust it where practical.
Pay attention to how you feel rather than simply assuming the insulation is sufficient. If you become increasingly cold, take action early.
10. Clear the area
When the activity is finished, remove any improvised materials you have introduced.
Scatter natural material back over the area where appropriate and leave the campsite looking as close as possible to how you found it.
Final Tip
The thicker the trapped-air layer, the better the insulation. What looks like an excessive pile of dry leaves or grass can compress dramatically once you lie on it, so build more insulation than you think you’ll need.
🔒Ready to test your survival skills?
Join Survival Guides UK for free, complete challenges, earn badges and increase your Survival Level.
JOIN FREE →
CRAIG BURR
FOUNDER · SURVIVAL GUIDES UK
I'm Craig, the person behind Survival Guides UK. I created SGUK because I wanted somewhere people could learn real outdoor skills in a practical, straightforward way — from lighting a fire and tying knots to navigation, campcraft and everything in between.
You can read more about the story behind SGUK here as well as our approach here.

Love it