Building a Pioneering Catapult: Scout Pioneering Guide
Activity Overview
Difficulty: Challenging
Time: 1–2 hours
Location: Scout campsites and suitable outdoor activity areas
Best for: Scouts, Explorers, Patrol Leaders and experienced pioneering groups
Skills: Pioneering, lashings, ropework, teamwork, construction and problem-solving
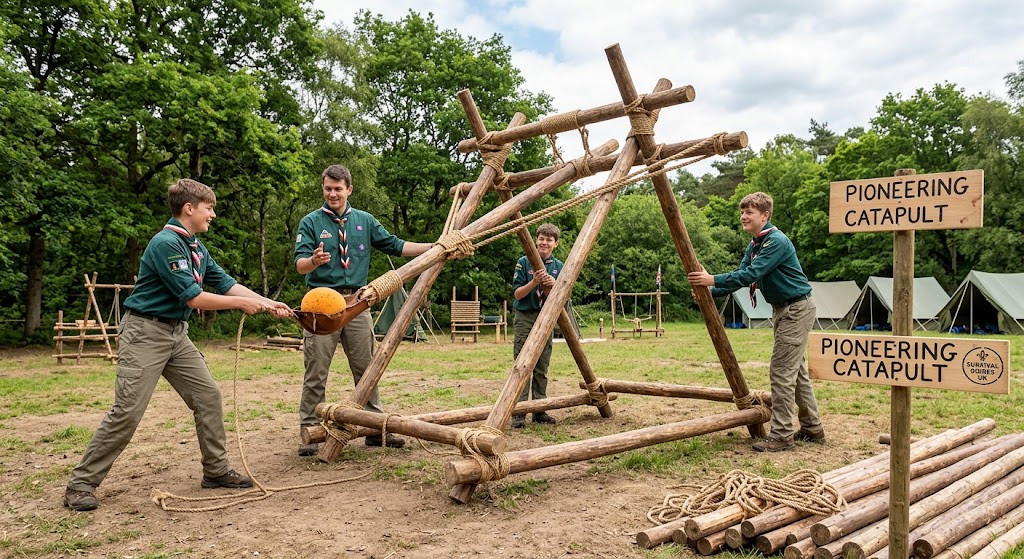
A pioneering catapult can be built as a controlled campcraft engineering project using poles, rope and a soft projectile.
The emphasis should be on learning how structures, lashings, tension and leverage work rather than creating a powerful launching device.
Only use soft, lightweight projectiles in a controlled area, with responsible adult supervision. Never aim a pioneering catapult at people, animals, buildings, vehicles or other property.
What You’ll Learn
You’ll learn how to combine poles and lashings to create a simple catapult frame.
You’ll also explore how tension, leverage and the position of the throwing arm affect the movement of a projectile.
The project provides an opportunity to practise construction, teamwork and controlled testing.
🔴 SAFETY – HIGH RISK
A catapult stores and releases energy, so components can move suddenly and projectiles can cause injury.
Use only soft, lightweight projectiles such as foam balls.
Never use stones, metal objects, wood, hard balls, fireworks or other dangerous objects as projectiles.
Never aim at people, animals, roads, tents, buildings or vehicles.
Establish a large exclusion zone around the firing area and make sure nobody can enter it while the catapult is being operated.
Only the designated operators should be near the mechanism during firing.
If the structure becomes damaged or unstable, stop using it immediately.
Equipment
You’ll need suitable pioneering poles and rope for the frame and lashings.
The design will also require a throwing arm and a suitable flexible or tensioned element.
Use a soft foam projectile for testing.
You may also need markers or cones to establish the firing and exclusion areas.
Use sound equipment that has been inspected before construction.
Prerequisites
Scouts should already understand basic pioneering knots and lashings, particularly the square lashing and diagonal lashing.
Everyone involved should understand the safety rules before construction starts.
The activity should be supervised by an adult who is comfortable managing pioneering construction and the associated risks.
Instructions
1. Choose the Location
Choose a large, open area with plenty of space beyond the expected landing area.
There should be no people, roads, buildings, vehicles or animals within the potential projectile path.
Establish the firing direction before construction begins.
2. Establish an Exclusion Zone
Mark out the area around the catapult.
Only the people directly involved in operating it should enter the immediate working area.
Everyone else should remain behind the agreed safety line.
The firing area should remain clear throughout testing.
3. Plan the Structure
Sketch the catapult before building it.
Identify the base, uprights, cross members and throwing arm.
Think about how the structure will remain stable when the throwing mechanism is released.
The objective should be a small, low-energy training device, not maximum range.
4. Inspect the Poles
Check all poles for cracks, splits, rot and other damage.
Don’t use poles that could fail when the structure is under tension.
Select poles according to their intended role rather than simply using whatever is closest.
5. Build the Base
Construct a stable base using appropriate poles and lashings.
The base needs to resist movement when the throwing mechanism operates.
Use accurate lashings and keep the frame square as you build.
6. Add the Uprights
Attach the upright poles to the base.
Secure each connection properly before moving on.
Keep the uprights aligned and make sure the whole frame remains stable.
7. Add Cross Bracing
Use diagonal bracing to reduce sideways movement.
A catapult frame that twists or shifts when tension is applied is not suitable for use.
Check the bracing and lashings before proceeding.
8. Construct the Throwing Arm
Fit the throwing arm according to the chosen design.
It should move freely without striking the frame or nearby people.
Keep the mechanism simple and limit the amount of stored energy.
9. Fit the Throwing Pouch
Attach a suitable soft pouch or sling to the end of the throwing arm.
It should securely hold the soft projectile during the initial movement without creating a dangerous release mechanism.
Check that all connections are secure before testing.
10. Check the Mechanism
Before loading anything, move the throwing arm carefully through its range of motion.
Check that it doesn’t catch on poles or ropes.
Make sure the frame remains stable.
If anything shifts, stop and correct it.
11. Carry Out a Dry Test
Test the movement without a projectile.
Operate the mechanism slowly and carefully.
Watch for unexpected movement, loose lashings or parts that could become trapped.
Do not proceed until the structure behaves as expected.
12. Start With a Soft Projectile
Use only a lightweight foam projectile.
Keep everyone outside the exclusion zone.
Make sure the landing area is completely clear before releasing it.
13. Use Controlled Testing
Begin with low-energy tests.
There is no need to maximise the range or tension.
After each test, inspect the structure for movement or damage.
If the catapult becomes unstable, stop the activity.
14. Maintain a Clear Firing Procedure
Everyone should know the procedure before each launch.
A simple command such as “Clear”, followed by confirmation that the firing area is empty, can help prevent misunderstandings.
Nobody should enter the firing area until the operator has confirmed that it is safe.
15. Don’t Modify It for More Power
Avoid progressively increasing tension or making structural modifications simply to achieve greater distance.
Increasing stored energy increases the potential consequences of component failure.
The educational value comes from understanding the mechanism, not from making the largest possible catapult.
16. Inspect Between Tests
Check the main lashings, frame, throwing arm and tensioning components regularly.
Look for frayed rope, loosened lashings, cracks or unexpected movement.
Stop immediately if anything appears damaged.
17. Stop When the Activity Is Finished
Once testing is complete, remove the tension from the mechanism.
Don’t leave the catapult cocked or under stored tension.
Make sure the area is safe before people approach the structure.
18. Dismantle and Store the Equipment
Dismantle the structure carefully and systematically.
Inspect the poles and ropes before returning them to storage.
Any damaged equipment should be removed from use.
Understanding the Mechanism
A pioneering catapult demonstrates several basic mechanical ideas.
The throwing arm acts as a lever, while the frame provides the supporting structure.
Rope and flexible components can store energy when tensioned, which is then transferred to the throwing arm and projectile.
The exact performance depends on the construction, materials and geometry of the design.
For a Scout project, the useful lesson is understanding these relationships rather than trying to maximise performance.
Making It a Patrol Activity
A catapult is well suited to teamwork.
One team can prepare poles while another prepares rope. Others can construct different parts of the frame before bringing everything together.
Once built, the patrol can inspect the structure and discuss why particular lashings and braces are necessary.
The testing stage can then become a controlled engineering exercise, comparing small changes to the design without increasing the energy of the device.
Safe Projectiles
The projectile should be soft, lightweight and incapable of causing significant injury.
Foam balls are a suitable example.
Never substitute harder or heavier objects because they travel further.
The firing area must remain clear regardless of how harmless the projectile appears.
Final Tip
The best pioneering catapult isn’t the one that fires the furthest.
It’s the one that teaches the patrol about lashings, leverage, tension, structural stability and controlled testing while keeping the activity safe.
Keep the design low-energy, use soft projectiles, establish a proper exclusion zone and never point the catapult towards people or property.
🔒Ready to test your survival skills?
Join Survival Guides UK for free, complete challenges, earn badges and increase your Survival Level.
JOIN FREE →
CRAIG BURR
FOUNDER · SURVIVAL GUIDES UK
I'm Craig, the person behind Survival Guides UK. I created SGUK because I wanted somewhere people could learn real outdoor skills in a practical, straightforward way — from lighting a fire and tying knots to navigation, campcraft and everything in between.
You can read more about the story behind SGUK here as well as our approach here.