Build a Bee Hotel Activity
Activity Overview
Can you build a safe little home for solitary bees?
👦 Age: 6–18
👥 Group size: 2–30
⏱️ Duration: 45–60 minutes
📍 Location: Outdoors or indoors
⭐ Difficulty: 2/5
Bees aren’t just busy making honey. They’re also incredibly important pollinators, helping plants produce fruits, seeds and new growth.
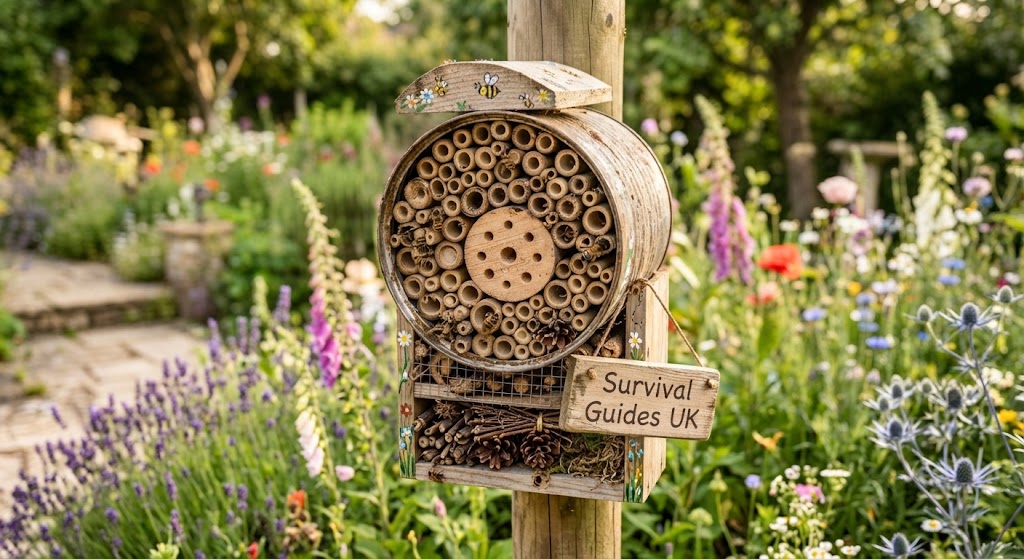
In this hands-on nature activity, you’ll learn a little about bees before designing and building your own bee hotel using simple materials.
It’s a great activity for Scouts, youth groups, school groups or anyone who enjoys getting outdoors and making something useful from recycled and natural materials.
The best part?
Once your bee hotel is finished, the activity doesn’t have to end. You can put it somewhere suitable and keep checking it to see whether any tiny visitors move in.
⚠️ Important: This activity is about providing a habitat for wildlife. Bee hotels won’t attract every type of bee, and they should be treated as a nature project rather than a way of handling or interacting with bees.
🧰 What you’ll need
Try to use clean, dry and safe materials.
Equipment
- Clean empty tins or small containers
- Bamboo canes
- Hollow plant stems
- Cardboard
- Paper
- String or garden twine
- Scissors
- Small sticks and twigs
- Leaves and other natural materials
- Paint and brushes
- Sticky tape
- Optional: gloves
If you’re making several bee hotels, ask participants to bring suitable clean containers from home.
Avoid materials that have sharp edges, chemical residues or could easily fall apart outdoors.
🌼 Before you start
Begin by asking the group what they already know about bees.
You could ask:
- What different types of bees can you name?
- Do all bees live in large colonies?
- What do bees get from flowers?
- Why are bees important to plants?
- Where might a wild bee make its home?
Explain that solitary bees are different from the familiar honey bee colony. Many solitary bees make individual nests rather than living together in a hive.
This makes the group think about what a bee might actually need from a small nesting space.
🐝 Design your bee hotel
Before building anything, give everyone a few minutes to design their bee hotel.
They could draw a quick plan showing:
- The container
- The nesting tubes
- How the materials will be held together
- Where the hotel could eventually be placed
Encourage them to think about the size of the openings.
Different bees can use different-sized nesting spaces, so having a mixture of natural tubes and stems can make the hotel more interesting.
🔨 Build your bee hotel
Start by preparing the outside of your container.
If you’re using a tin, check carefully for sharp edges. An adult should deal with any cutting or sharp tools.
Next, prepare the nesting material.
Cut pieces of bamboo, cardboard tubes or hollow stems so they’re slightly shorter than the depth of the container.
The tubes should have an open end.
Arrange the pieces inside the container so that they’re packed reasonably tightly together.
You can mix different sizes and materials rather than making every tube identical.
Once everything is in place, add small sticks or other natural materials around the gaps to help hold the contents together.
Don’t completely block the openings — the bees need access to the nesting spaces.
🎨 Decorate your hotel
Now comes the creative part.
You can decorate the outside of your bee hotel using paint or other safe materials.
You could:
- Paint it like a bee
- Give it a woodland design
- Add a name
- Create a colourful pattern
- Make a tiny “Bee Hotel” sign
Try to keep decoration on the outside rather than filling the nesting spaces with unnecessary materials.
📍 Find the perfect spot
Your bee hotel needs somewhere suitable to stay.
Look for a location that is:
- Sheltered from heavy rain
- Securely positioned
- Away from areas where it could be knocked over
- Suitable for observing wildlife
- Exposed to some warmth and sunlight
An adult should check the chosen location before the hotel is installed.
Don’t place it somewhere that requires participants to climb, reach over hazards or get close to unsafe areas.
🔎 Become a bee detective
This is where the activity becomes a long-term nature project.
Once the bee hotel is installed, create a simple observation sheet.
Each time you check it, record:
- Date
- Weather
- Whether you saw any insects
- Which part of the hotel they were investigating
- Anything else interesting
Don’t disturb the insects or poke objects into the nesting tubes.
The aim is to watch rather than interfere.
You could even turn it into a group competition to see who can spot the greatest variety of insects visiting the area.
🌱 Take the activity further
Building a bee hotel is only one way to think about wildlife habitats.
Ask the group to come up with other ways they could make an outdoor space more wildlife-friendly.
Ideas might include:
- Planting pollinator-friendly flowers
- Leaving part of a garden or outdoor area wild
- Creating a small log pile
- Providing natural shelter
- Learning to identify different insects
- Keeping outdoor areas free from litter
You could give each person a piece of paper and ask them to design their perfect wildlife garden.
🎯 Make it a team game
For larger groups, turn the building session into a design competition.
Split everyone into small teams.
Give each team the same basic selection of materials and ask them to create a bee hotel that meets three requirements:
- It must have several nesting spaces.
- It must be securely constructed.
- It must have a creative design.
Afterwards, each team explains why they made their choices.
You could award points for:
🌿 Wildlife thinking — 10 points
Did the team think about what insects need?
🔨 Construction — 10 points
Is the hotel securely put together?
🎨 Creativity — 10 points
Does the design stand out?
🧠 Teamwork — 10 points
Did everyone have an opportunity to contribute?
Maximum score: 40 points.
💬 What did you learn?
Bring everyone together at the end and ask:
- What surprised you about bees?
- Why are pollinators important?
- What makes a good wildlife habitat?
- What materials worked best?
- What would you change if you built another hotel?
- Where else could we create spaces for wildlife?
- How could we make our meeting place better for nature?
Encourage the group to think beyond bees.
There are lots of different creatures sharing our outdoor spaces, and small changes can make those spaces more useful for wildlife.
♿ Make it accessible
The activity can easily be adapted for different abilities.
Participants can take different roles, including:
- Designer
- Materials manager
- Builder
- Decorator
- Wildlife researcher
- Photographer
- Observation recorder
If cutting materials isn’t suitable for everyone, prepare the pieces beforehand.
Participants can also work in pairs or small teams rather than building individual hotels.
The observation and research parts of the activity can be just as important as the construction.
🛡️ Safety
Make sure all materials are clean and safe to handle.
Take particular care with tins, scissors and any cutting tools. Sharp edges should be removed or dealt with by an adult, and appropriate supervision should be provided.
Wash hands after handling natural materials and before eating.
If the activity takes place outdoors, check the area beforehand and consider weather conditions, uneven ground and any nearby hazards.
Don’t encourage participants to handle bees or other insects.
Follow your organisation’s relevant safeguarding, supervision and risk-assessment procedures when running the activity.
🐝 Your bee hotel is ready
You’ve designed it, built it and found it a home.
Now the really interesting part begins.
Keep an eye on your bee hotel over the coming weeks and months. You might discover that your little construction project becomes a useful way to observe nature right outside your door.
Build it. Watch it. Learn from it. Help wildlife.
🔒Ready to test your survival skills?
Join Survival Guides UK for free, complete challenges, earn badges and increase your Survival Level.
JOIN FREE →
CRAIG BURR
FOUNDER · SURVIVAL GUIDES UK
I'm Craig, the person behind Survival Guides UK. I created SGUK because I wanted somewhere people could learn real outdoor skills in a practical, straightforward way — from lighting a fire and tying knots to navigation, campcraft and everything in between.
You can read more about the story behind SGUK here as well as our approach here.