Star Fire Building Activity
Activity Overview
Can your team build a stable star-shaped campfire?
👦 Age: 8–18
👥 Group size: 4–24
⏱️ Duration: 45–60 minutes
📍 Location: Outdoors
⭐ Difficulty: 3/5
A good campfire doesn’t happen by accident.
Before you strike a match or create a spark, you need to think about the location, fuel, airflow, structure and safety around the fire.
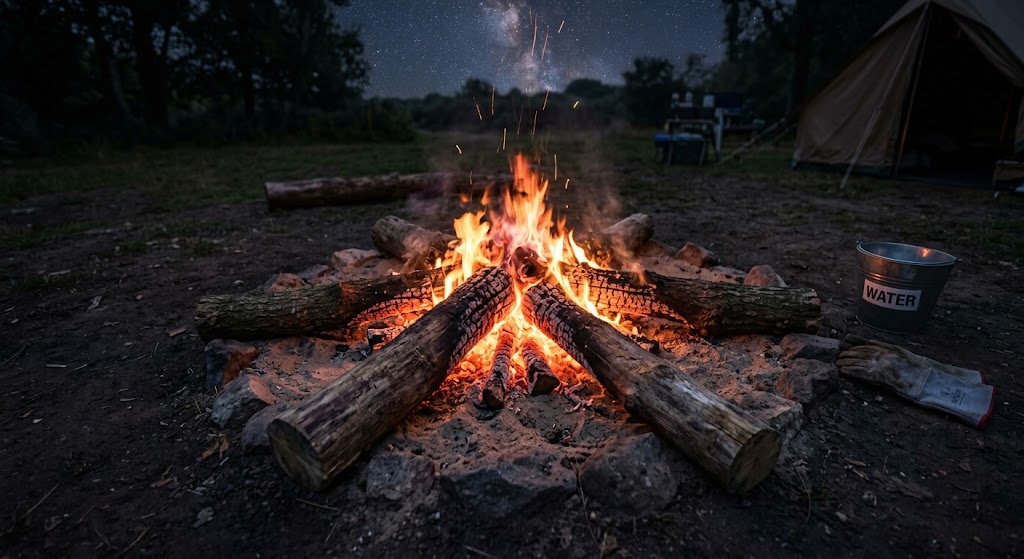
In this outdoor activity, you’ll learn about the star fire — a useful campfire design made by arranging logs around a central fire.
You’ll work in small teams to plan and build the structure, learn how different sizes of wood work together and understand how to manage a fire safely.
For younger groups, or where lighting a fire isn’t appropriate, the activity can be completed entirely as a build-and-inspect exercise without lighting the fire.
⚠️ Important: Real fires should only be built where permitted, after an appropriate risk assessment, with suitable adult supervision and proper fire-extinguishing equipment available. This activity is not a substitute for formal fire-lighting training.
🧰 What you’ll need
For each team, provide a suitable selection of dry firewood.
Equipment
- 5–6 suitable dry logs
- Small dry sticks
- Kindling
- Tinder
- Matches or another suitable fire-lighting method
- Fire bucket filled with water
- Additional firefighting equipment as appropriate
- Heat-resistant gloves for the responsible adult
- A safe, designated fire area
- Optional: cooking equipment
Collect or prepare the wood before beginning so that everyone can concentrate on the activity.
The exact amount and type of fuel will depend on the size of the fire, location and conditions.
🛡️ Start with fire safety
Before anyone starts building, stop and talk about the most important part of the activity: staying safe around fire.
Ask the group:
- Where would be a safe place for a campfire?
- What could make a fire spread?
- Why does the weather matter?
- What should you do if you see something unsafe?
- Where should the water bucket be?
- Who is responsible for supervising the fire?
Explain that the group should never simply decide to light a fire wherever they happen to be.
You need permission to use the location, a suitable fire area, appropriate supervision and a plan for dealing with the fire safely.
The responsible adult should remain in charge of the live fire.
🌲 Choose your firewood
Give each team a selection of wood.
Ask them to sort it into groups according to size.
For example:
Tinder
Very small material that catches easily.
Kindling
Small dry sticks that help the initial flame grow.
Small fuel
Larger sticks that can keep the fire developing.
Logs
The main fuel that will form the star.
Ask the teams why they think different sizes of wood are useful.
This introduces an important fire-building principle:
A fire needs the right fuel at the right stage.
⭐ Build the star
Now it’s time to construct the fire.
Place the larger logs so that they extend towards the centre from different directions.
The logs should form a rough star shape when viewed from above.
The centre is where the initial fire will be built.
Don’t rush this part.
The structure needs to be stable, and everyone should be able to explain why the logs have been positioned where they are.
Build the centre
Next, the team needs to create a small structure above the centre of the star.
Use suitable small sticks and kindling to create a loose framework around the tinder.
The structure needs enough space for air to move through it.
Don’t squash everything together.
Ask the team:
What happens if you pack the wood too tightly?
This is a good opportunity to introduce the fire triangle:
1. Heat
2. Fuel
3. Oxygen
A fire needs all three.
Remove one of them and the fire cannot continue burning.
🔍 Inspect the fire
Before anything is lit, stop the teams.
Give each group a few minutes to inspect its own fire.
Ask them to check:
- Is the fire structure stable?
- Is the tinder accessible?
- Is there enough suitable kindling?
- Can air reach the centre?
- Is the surrounding area clear?
- Is the fire an appropriate size?
- Is the firefighting equipment ready?
- Does everyone know where the safety boundary is?
You can turn this into a Fire Inspector game.
One team member becomes the inspector and looks for anything that needs changing.
Then swap roles.
🧠 The Fire Builder’s Quiz
Before lighting anything, test what the teams have learned.
Ask questions such as:
What are the three parts of the fire triangle?
Heat, fuel and oxygen.
Why shouldn’t you pack the kindling tightly?
Because the fire needs airflow.
Why does dry wood usually work better than wet wood?
It is easier to ignite and burn effectively.
What should you do if you see something unsafe?
Stop and tell the responsible adult.
Who should be responsible for a live fire?
A suitably responsible adult who is supervising the activity.
Award one point for every correct answer.
🔥 Optional: Light the fire
If the activity has been properly planned and it is appropriate to light the fire, the responsible adult can take control of this stage.
Participants should stay behind the agreed safety boundary and follow the instructions given by the adult.
The adult should handle the actual ignition and any adjustments that require close contact with the fire.
As the fire develops, watch what happens.
Can the group identify when the tinder catches?
When does the kindling begin burning?
How does the fire change as larger pieces of fuel become involved?
This turns the fire into a practical lesson rather than simply something to watch.
👀 Fire Watch
Once the fire is established, give the group a simple observation task.
Ask them to watch the fire and identify changes.
For example:
- Which materials burn first?
- Where are the hottest-looking areas?
- Does the shape of the fire change?
- What happens as the wood burns down?
- Does the star shape remain visible?
Don’t allow participants to approach the fire to investigate.
They can observe from the safe area.
🏆 Score your team
If you want to turn the activity into a game, award points for the preparation stage.
Fire structure — 10 points
Was the star stable and well constructed?
Airflow — 10 points
Did the team understand the importance of space around the fuel?
Safety awareness — 10 points
Did they identify the important safety considerations?
Knowledge — 10 points
Did they understand the fire triangle and different fuel types?
Teamwork — 10 points
Did everyone contribute?
Maximum score: 50 points.
Safety should always come before winning.
A team that builds the quickest fire isn’t necessarily the best team.
🧯 Extinguish safely
When the activity is finished, the fire needs to be properly extinguished.
The responsible adult should take control of this process.
Stop adding fuel and allow the fire to reduce appropriately before extinguishing it according to the site’s fire arrangements and the risk assessment.
Water can be used where appropriate.
The fire should be thoroughly checked to make sure there are no remaining hot embers before the area is left.
Leave the site clean and restore the area as required.
Never leave a fire unattended.
💬 What did you learn?
Once everything is safely finished, gather everyone together.
Ask:
- What makes a good fire structure?
- Why is airflow important?
- Which type of fuel caught first?
- What happened as larger pieces of wood were added?
- What was the most important safety rule?
- What would you change about your design?
- Why is planning important before lighting a fire?
- How could you make the activity safer for someone who had never used fire before?
The discussion helps turn the activity from simply building a fire into understanding how fire works.
♿ Make it accessible
Not everyone needs to work directly beside the fire.
Participants can take different roles, such as:
- Fire designer
- Wood sorter
- Safety inspector
- Fire triangle expert
- Team leader
- Observer
- Scorekeeper
For younger participants, build the structure without lighting it.
You can also provide a pre-built example and ask participants to identify the different parts and explain how they work.
This allows everyone to learn about fire without everyone needing to handle fire-lighting equipment.
🛡️ Safety
Fire activities require careful planning.
Only build fires in suitable locations where you have permission and where fires are allowed.
Complete an appropriate risk assessment and check weather and wind conditions before starting.
Keep the fire an appropriate size for the location and group.
Have suitable firefighting equipment immediately available, including water where appropriate.
Establish a clear safety boundary and make sure everyone understands that they must not cross it unless instructed.
A responsible adult should supervise the live fire throughout the activity.
Keep participants away from hot equipment, flames and embers, and never leave a fire unattended.
Take care with smoke, loose clothing, long hair and any nearby combustible materials.
If conditions aren’t suitable, don’t light the fire. The whole activity can still be completed as a fire-building and fire-safety exercise.
Always follow your organisation’s current fire, safeguarding and activity safety guidance.
🔥 Ready for the next campfire?
You’ve learned that building a fire isn’t simply a matter of putting some wood in a pile and lighting it.
A successful campfire starts with planning, preparation and safety.
The star fire gives you a practical way to explore fuel, airflow, fire structure and teamwork while enjoying time outdoors.
Plan carefully. Build safely. Respect fire.
🔒Ready to test your survival skills?
Join Survival Guides UK for free, complete challenges, earn badges and increase your Survival Level.
JOIN FREE →
CRAIG BURR
FOUNDER · SURVIVAL GUIDES UK
I'm Craig, the person behind Survival Guides UK. I created SGUK because I wanted somewhere people could learn real outdoor skills in a practical, straightforward way — from lighting a fire and tying knots to navigation, campcraft and everything in between.
You can read more about the story behind SGUK here as well as our approach here.