Distress Signals: Scout Emergency Skills Guide
Activity Overview
Difficulty: Moderate
Time: 30–45 minutes
Location: Campsites, woodland, open countryside and suitable outdoor training areas
Best for: Scouts, Explorers, Patrol Leaders and adult leaders
Skills: Emergency communication, signalling, situational awareness, emergency planning and outdoor safety
A distress signal is used to show that you need help in an emergency.
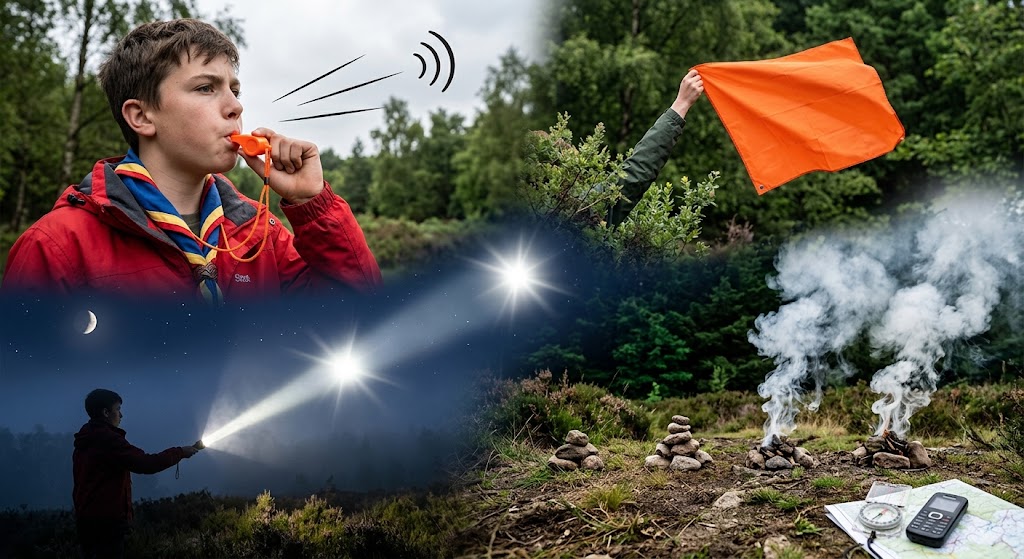
For Scouts, useful methods include a whistle, torch, voice, visual signals and a mobile phone. The important principles are to attract attention, communicate your location and avoid making the situation worse.
A distress signal should never be used as a joke or ordinary communication.
What You’ll Learn
You’ll learn how to recognise when a distress signal is appropriate and how to use several simple signalling methods.
You’ll also learn common whistle and visual signals, how to communicate your location and what to do after attracting attention.
🔴 SAFETY – HIGH RISK
Distress signalling is for genuine emergencies or situations where assistance is genuinely required.
If there is a serious or life-threatening emergency, contact the emergency services as soon as possible. In the UK, 999 or 112 can be used.
Don’t create additional hazards while trying to attract attention.
Don’t move into dangerous terrain simply to make yourself more visible.
Once help has been contacted, follow instructions and avoid moving unnecessarily unless your current location is unsafe.
Equipment
A whistle is one of the most useful emergency signalling tools for outdoor activities.
A charged mobile phone can provide direct communication where there is sufficient signal.
A torch is useful for signalling at night.
A map and compass help you establish and communicate your location.
Bright or contrasting clothing and equipment can provide useful visual signals in suitable circumstances.
Prerequisites
Scouts should know the group’s emergency procedure before starting an outdoor activity.
Everyone should know where signalling equipment is kept.
Scouts should also understand basic map reading and be able to describe their location using recognisable features or a grid reference.
Instructions
1. Recognise When You Need Help
A distress signal may be appropriate when someone is seriously injured, the group is lost or stranded, there is an immediate danger, or the group cannot safely continue without assistance.
Don’t use distress signals simply because an activity has become inconvenient.
2. Contact Emergency Services
If you have a phone signal and there is a serious emergency, contact the emergency services.
Give clear information about what has happened, how many people are involved and where you are.
Keep the phone available for further communication.
3. Give Your Location
Your location is often the most important information you can provide.
Use a map and compass to establish a grid reference where possible.
You can also describe nearby paths, roads, buildings, hills, rivers or other distinctive landmarks.
If using a phone, location information may provide additional assistance.
4. Use a Whistle
A whistle is particularly useful because it carries further than a voice and requires relatively little energy.
A commonly taught countryside distress signal is:
Six blasts → pause → repeat.
Make the blasts distinct and allow time to listen for a response.
If your group has been taught a different signalling procedure for a particular activity, follow that established procedure.
5. Listen Between Signals
Don’t continuously whistle.
After signalling, stop and listen carefully.
A response from rescuers or other people may help you establish whether your signal has been noticed.
6. Use a Torch at Night
A torch can attract attention in darkness or poor visibility.
Use deliberate flashes and conserve the battery.
Keep yourself in a safe position while signalling.
7. Make Yourself Visible
In daylight, bright or contrasting equipment can help rescuers identify your position.
If it is safe to do so, position yourself where you are visible from likely search routes.
Never climb somewhere dangerous just to improve visibility.
8. Use Your Voice
If you don’t have a whistle, shouting can attract attention.
Use short, deliberate calls followed by periods of listening.
Avoid exhausting yourself by shouting continuously.
9. Use Visual Signals
A suitable bright item can be waved from a safe location to attract attention.
Movement can make an otherwise difficult-to-see person easier to spot.
Keep the signal simple and repeat it when necessary.
10. Stay Together
Keep the group together wherever possible.
Don’t split up simply to increase the chance that somebody will find help.
If someone must leave the group as part of an established emergency plan, ensure the remaining group has appropriate supervision and support.
11. Stay Put When Appropriate
Once emergency services know where you are, remaining in a safe, identifiable location can make finding you easier.
If your current position becomes dangerous, move to a safer location and communicate the change if possible.
12. Conserve Equipment
A rescue may take time.
Protect phone batteries and use torches and other signalling equipment deliberately.
Keep warm, stay sheltered where appropriate and manage food and water sensibly.
13. Respond to Searchers
If you hear a search party or see rescuers, use your agreed signal to attract their attention.
Make yourself visible without putting yourself in danger.
14. Stop the Distress Signal When Help Arrives
Once rescuers have clearly located you, stop unnecessary signalling and follow their instructions.
If an emergency call or organised search was initiated, make sure the relevant people know when the emergency has been resolved.
Common Distress Signals
|
Method |
Example |
Best used |
|---|---|---|
|
Whistle |
Six blasts, pause, repeat |
Day or night |
|
Torch |
Repeated deliberate flashes |
Darkness |
|
Voice |
Short calls followed by listening |
When people may be nearby |
|
Visual |
Bright item or deliberate movement |
Daylight |
|
Phone |
Emergency call or location information |
Where signal is available |
Whistle Distress Signals
A whistle is particularly useful for Scouts because it is small, lightweight and easy to carry.
The commonly taught pattern of six blasts followed by a pause should be taught consistently within the group.
The important thing is that everyone understands what constitutes a genuine distress signal and doesn’t use it casually.
Three-Item Signals
Groups may encounter the idea of arranging three fires, three piles of objects or three other obvious signals to indicate distress.
These are traditional signalling conventions, but they should not replace direct contact with emergency services where communication is possible.
Never create additional fires or other hazards merely to practise this technique.
Distress Signals and Navigation
Signalling and navigation work together.
Knowing your exact or approximate location makes a distress signal much more effective.
A whistle can tell rescuers that someone needs help; a grid reference tells them where to look.
This is why Scouts should practise both emergency signalling and basic navigation.
Practising Distress Signals
A safe Scout exercise can involve a fictional scenario where a patrol has become separated from its intended route.
Ask the patrol to identify:
- Whether they actually need assistance.
- Their location.
- Which signalling equipment they have.
- Which signal they would use.
- What information they would give rescuers.
- What they would do while waiting.
Practise whistle signals only in a controlled setting and make sure everyone nearby knows that it is a training exercise.
What Not to Do
Don’t use distress signals as a game or prank.
Don’t repeatedly call emergency services for practice.
Don’t wander around looking for rescuers after you’ve given them your location unless instructed or your position is unsafe.
Don’t create uncontrolled fires, climb dangerous structures or enter hazardous terrain to attract attention.
Don’t assume that a single signal will automatically be noticed—use appropriate methods repeatedly and systematically.
Final Tip
A good distress signal does three things: attracts attention, communicates that help is needed and helps rescuers find you.
For Scouts, the whistle is one of the simplest methods to practise, but knowing your location and having a clear emergency plan are just as important.
🔒Ready to test your survival skills?
Join Survival Guides UK for free, complete challenges, earn badges and increase your Survival Level.
JOIN FREE →
CRAIG BURR
FOUNDER · SURVIVAL GUIDES UK
I'm Craig, the person behind Survival Guides UK. I created SGUK because I wanted somewhere people could learn real outdoor skills in a practical, straightforward way — from lighting a fire and tying knots to navigation, campcraft and everything in between.
You can read more about the story behind SGUK here as well as our approach here.