Bow Drill Fire Lighting
Activity Overview
Difficulty: Advanced
Time: 60–90 minutes
Location: Suitable outdoor fire-lighting area
Best for: Scouts and Explorers
Skills: Friction fire lighting, woodcraft, fire safety, patience, observation, problem-solving
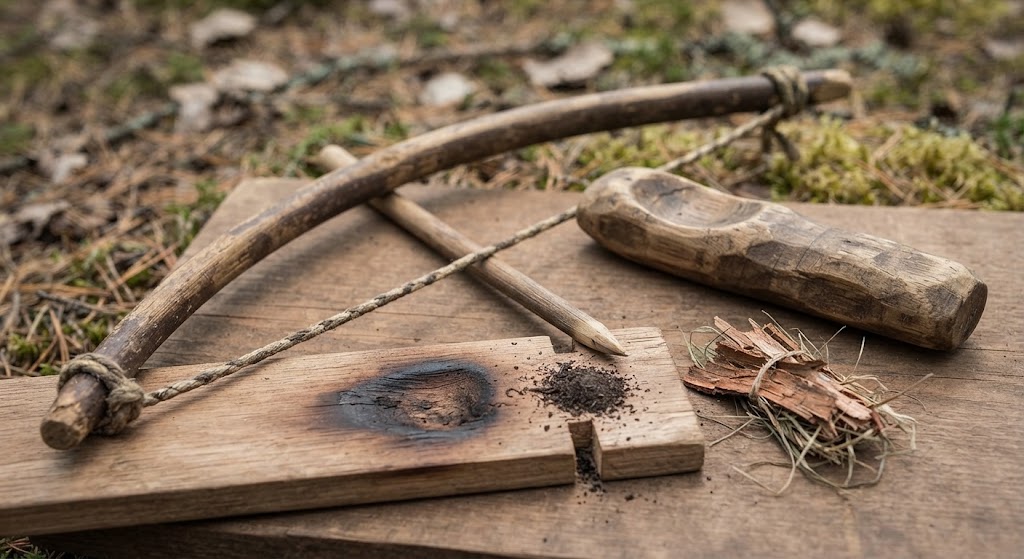
A bow drill creates an ember through friction between a rotating wooden spindle and a fireboard. A bow provides the movement, while a bearing block holds the top of the spindle in position.
The aim is not to produce a large flame immediately. First, you create fine, hot wood dust, build it into an ember and then carefully transfer that ember into suitable tinder.
What You’ll Learn
You will learn how a bow drill works, how to prepare the main components and how pressure, speed, friction and dry materials affect the process.
You will also practise patience and troubleshooting, as successful friction fire lighting often requires several attempts.
🔴 SAFETY – HIGH RISK
This activity involves producing an ember and potentially an open flame. It should only be carried out in a properly prepared fire-lighting area with suitable adult supervision and according to the group’s fire-safety procedures.
Keep combustible materials away from the working area and have suitable means of extinguishing a fire immediately available.
Only use dry, untreated natural materials that have been approved for the activity. Do not use timber treated with preservatives, paints or other chemicals.
Keep hair, loose clothing and fingers away from the moving spindle and bow.
Once an ember has been produced, treat it as a live source of fire. Do not leave it unattended.
Equipment
You will need a suitable bow, a strong cord, a wooden spindle, a fireboard, a bearing block and suitable dry tinder.
A small knife or other approved cutting tool may be required to prepare the wooden components, but this should only be used by Scouts who have been trained and are authorised to use it.
You will also need the equipment required by your normal fire-lighting setup for safely containing and extinguishing the fire.
Prerequisites
Before attempting a bow drill, Scouts should understand basic fire-lighting safety and have experience handling fire safely under supervision.
It is useful to have already practised simpler fire-lighting methods, such as matches or a ferrocerium rod, so that the focus can remain on the friction-fire technique.
Instructions
1. Prepare the fire area
Set up in a designated fire-lighting area away from tents, dry vegetation and other combustible materials.
Make sure the area is clear and that suitable extinguishing equipment is immediately available.
Do not begin until the supervising leader has confirmed that conditions are suitable.
2. Understand the bow drill
A bow drill has four main working parts.
The bow holds the cord and moves backwards and forwards.
The spindle rotates as the bow moves.
The fireboard provides the friction surface.
The bearing block holds the top of the spindle while allowing it to rotate.
Understanding how these parts work together makes troubleshooting much easier.
3. Prepare the fireboard
Cut or prepare a small notch and depression in the fireboard where the spindle will rotate.
The notch allows the hot wood dust produced by friction to collect rather than being trapped underneath the spindle.
This preparation needs to be neat and controlled. The exact shape will depend on the materials being used.
4. Prepare the spindle
The spindle should be reasonably straight and suitable for the fireboard material.
Shape the bottom so that it can create friction against the fireboard.
The top should work effectively with the bearing block and rotate smoothly.
5. Set up the bow
Attach the cord to the bow so that it can grip the spindle without excessive slipping.
The cord should be tight enough to rotate the spindle effectively while still allowing the bow to move smoothly.
Avoid making the cord unnecessarily tight, as this can make the system difficult to operate.
6. Start slowly
Place the spindle in the depression on the fireboard and position the bearing block on top.
Begin moving the bow backwards and forwards using smooth, controlled strokes.
At this stage, concentrate on keeping the spindle vertical and maintaining a consistent rhythm.
7. Build friction
As the technique becomes comfortable, increase the speed and pressure gradually.
You are looking for fine, dark wood dust to collect around the notch.
Do not concentrate solely on speed. A consistent stroke that keeps the spindle rotating properly is more useful than rapid movements that cause the system to slip.
8. Look for signs of an ember
As the friction increases, the wood dust should become hotter and may begin to smoke.
Smoke by itself does not mean that you have an ember.
Continue working until the material in the notch becomes sufficiently hot to form a glowing ember.
9. Transfer the ember
Once an ember has formed, stop carefully and allow the hot material to develop.
Transfer it into a prepared bundle of suitable dry tinder without touching it directly.
Handle the tinder gently so that the ember is not scattered or extinguished.
10. Build the flame
Gently blow onto the tinder to encourage the ember to develop.
Once the tinder catches, gradually add small dry fuel rather than immediately placing large pieces of wood onto it.
Build the fire progressively and keep it under control.
11. Extinguish the fire
When the activity is complete, extinguish the fire completely according to your group’s fire-safety procedure.
Check for remaining heat or embers before leaving the area.
Never assume that a fire is out simply because you can no longer see flames.
12. Troubleshoot the technique
If you cannot produce an ember, check one variable at a time.
The materials may be damp, the spindle may be slipping, the cord may have insufficient tension, the pressure may be wrong or the bow stroke may be inconsistent.
Changing everything at once makes it difficult to understand what went wrong.
Final Tip
Friction fire lighting is more about technique than strength. Keep the spindle steady, maintain a consistent rhythm and pay attention to what the wood is telling you. When the technique is right, the ember is the result of controlled friction rather than brute force.
🔒Ready to test your survival skills?
Join Survival Guides UK for free, complete challenges, earn badges and increase your Survival Level.
JOIN FREE →
CRAIG BURR
FOUNDER · SURVIVAL GUIDES UK
I'm Craig, the person behind Survival Guides UK. I created SGUK because I wanted somewhere people could learn real outdoor skills in a practical, straightforward way — from lighting a fire and tying knots to navigation, campcraft and everything in between.
You can read more about the story behind SGUK here as well as our approach here.