Flint-and-Steel Fire Lighting: Scout Campcraft Guide
Activity Overview
Difficulty: Moderate
Time: 30–45 minutes
Location: Scout campsites and suitable outdoor fire areas
Best for: Scouts, Explorers, Patrol Leaders and experienced Cubs under close supervision
Skills: Fire lighting, flint-and-steel technique, tinder preparation, fire safety and campcraft
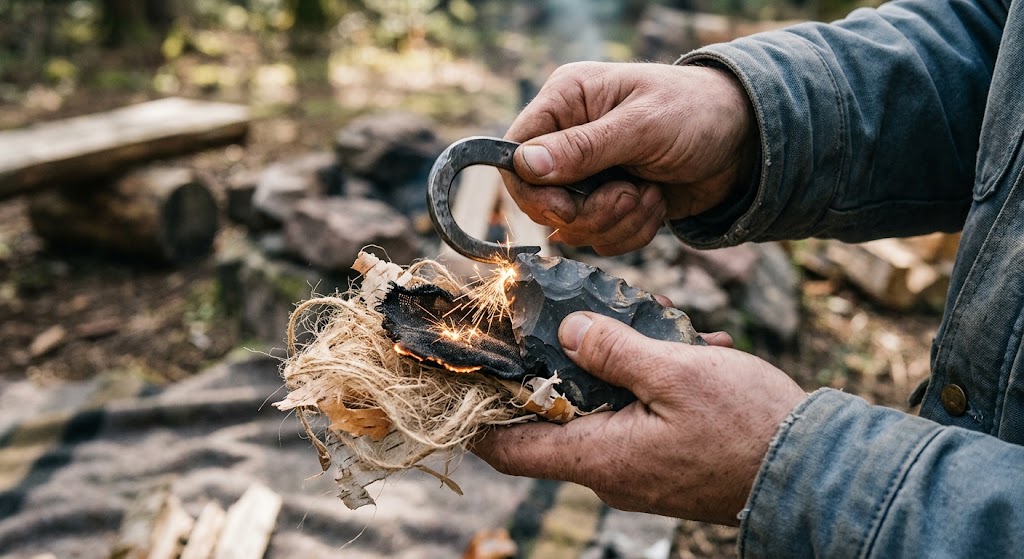
Flint-and-steel fire lighting works by striking hardened steel against a suitable piece of flint to create small sparks.
Unlike a ferrocerium rod, the sparks from traditional flint and steel are relatively small, so the technique depends heavily on having suitable tinder that can catch and hold a spark.
For Scouts, it is best treated as a traditional fire-lighting skill and practised in a controlled fire area with appropriate supervision.
What You’ll Learn
You’ll learn how to prepare tinder and produce sparks using traditional flint and steel.
You’ll also learn how to catch a spark in suitable tinder, develop the resulting ember into a flame and safely establish a small fire.
🔴 SAFETY – HIGH RISK
Flint-and-steel produces sparks capable of igniting dry materials.
Use it only where fires are permitted and within an appropriate fire area.
Keep sparks directed towards the intended tinder and away from people, clothing, tents and dry vegetation.
The flint can produce sharp edges and small fragments, so handle it carefully.
Keep a suitable means of extinguishing the fire immediately available.
Never leave the resulting fire unattended.
If conditions are very dry or windy, don’t attempt to light a fire.
Equipment
You’ll need a suitable piece of flint and a traditional hardened-steel striker.
You’ll also need suitable tinder capable of catching a small spark.
Dry kindling and suitable fuel wood should be prepared before attempting to create the flame.
A designated fire area or approved fire container is required.
Keep water or another suitable means of extinguishing the fire nearby.
Prerequisites
Scouts should understand basic fire safety and know whether fires are permitted at the site.
It helps to understand the difference between creating a spark and creating a flame.
The fire should be prepared before the flint and steel are used.
Instructions
1. Check the Fire Area
Use an established fire area where available.
Clear unnecessary combustible materials from around the working area.
Check the weather and wind conditions.
If conditions aren’t suitable for a fire, postpone the activity.
2. Prepare the Fire
Have your tinder, kindling and fuel ready before producing sparks.
Don’t start striking the flint while you’re still looking for materials.
The tinder needs to be particularly suitable because traditional flint and steel produces a small spark rather than a large shower of hot sparks.
3. Prepare the Tinder
A suitable tinder material needs to catch and hold a spark.
Traditionally, char cloth is used because it can catch a spark and develop a glowing ember.
Other suitable natural tinder materials may be used where appropriate, provided they are dry and capable of catching the relatively small spark.
4. Hold the Flint
Hold the flint securely.
Position a suitable sharp edge so that the steel striker can strike against it.
Keep your fingers away from the striking edge.
5. Hold the Steel
Hold the steel striker firmly.
Position it so that the striking movement is controlled and directed away from your body.
The aim is to scrape or strike the steel against the flint in a controlled manner.
6. Produce the Spark
Strike the steel against the flint with a firm, controlled movement.
Don’t swing wildly.
The sparks should travel towards the prepared tinder.
It may take several attempts to produce a useful spark, particularly while learning the technique.
7. Catch the Spark
Once a spark lands on the tinder, stop striking and concentrate on protecting it.
With suitable tinder, a small glowing ember should begin to develop.
Avoid disturbing the ember unnecessarily.
8. Develop the Ember
Carefully encourage the ember to spread through the tinder.
Gentle airflow can help it develop.
Don’t put your face directly over the tinder and don’t blow so forcefully that the material is scattered.
9. Transfer the Ember to the Tinder Bundle
Once you have a sufficiently developed ember, place it into a prepared tinder bundle or other suitable fine tinder.
Carefully encourage the ember to ignite the surrounding material.
This is the point where a small glowing ember becomes a visible flame.
10. Add Fine Kindling
Once a flame has developed, introduce small pieces of dry kindling.
Place them carefully so they don’t smother the flame.
Leave gaps for air to circulate.
11. Build the Fire Gradually
Allow the kindling to establish itself before adding larger fuel.
Increase the size of the wood progressively.
A well-prepared fire should grow without needing a large amount of fuel at once.
12. Keep the Fire Controlled
Once established, maintain the fire within its designated area.
Keep people, equipment and combustible materials at a safe distance.
Don’t deliberately create large flames or throw objects into the fire.
13. Extinguish the Fire
When finished, extinguish the fire thoroughly according to the campsite’s procedures.
Make sure remaining embers cannot reignite.
Don’t leave simply because the visible flames have disappeared.
14. Check the Area
Inspect the fire area before leaving.
Check for glowing embers or smouldering material, particularly around the edges of the fire.
Leave the area in the condition required by the campsite.
Understanding the Sparks
The traditional flint-and-steel method is sometimes misunderstood.
The spark is produced because the hard flint strikes and removes tiny particles of the softer steel. These tiny particles heat rapidly and can glow sufficiently to ignite suitable tinder.
This is different from a ferrocerium rod, where the rod itself supplies the material that forms the sparks.
Flint-and-Steel vs Ferrocerium Rod
Traditional flint and steel generally requires more preparation and technique.
A ferrocerium rod produces a much larger and hotter shower of sparks, making it considerably easier to ignite modern tinder.
Flint and steel therefore makes an excellent traditional campcraft skill, particularly for teaching patience and tinder preparation.
Choosing Flint
A suitable piece of flint should have an appropriate sharp edge capable of striking the steel effectively.
Handle it carefully because freshly struck flint can have very sharp edges.
Don’t use damaged pieces that are difficult to control.
Using Char Cloth
Char cloth is traditionally made by heating natural cloth in an oxygen-limited environment until it becomes carbonised.
It can catch a relatively small spark and turn it into a glowing ember.
If demonstrating traditional fire lighting, preparing char cloth can itself be an interesting campcraft exercise, but it should be done using an appropriate controlled method and with suitable supervision.
Final Tip
Flint-and-steel fire lighting is less about striking harder and more about preparing the right tinder and controlling the spark.
Have everything ready before you begin, use deliberate strokes and give the ember time to develop.
Once the flame appears, build it gradually and manage the resulting fire with the same care as any other campfire.
🔒Ready to test your survival skills?
Join Survival Guides UK for free, complete challenges, earn badges and increase your Survival Level.
JOIN FREE →
CRAIG BURR
FOUNDER · SURVIVAL GUIDES UK
I'm Craig, the person behind Survival Guides UK. I created SGUK because I wanted somewhere people could learn real outdoor skills in a practical, straightforward way — from lighting a fire and tying knots to navigation, campcraft and everything in between.
You can read more about the story behind SGUK here as well as our approach here.