How to Run a Shelter Building Activity for Scouts
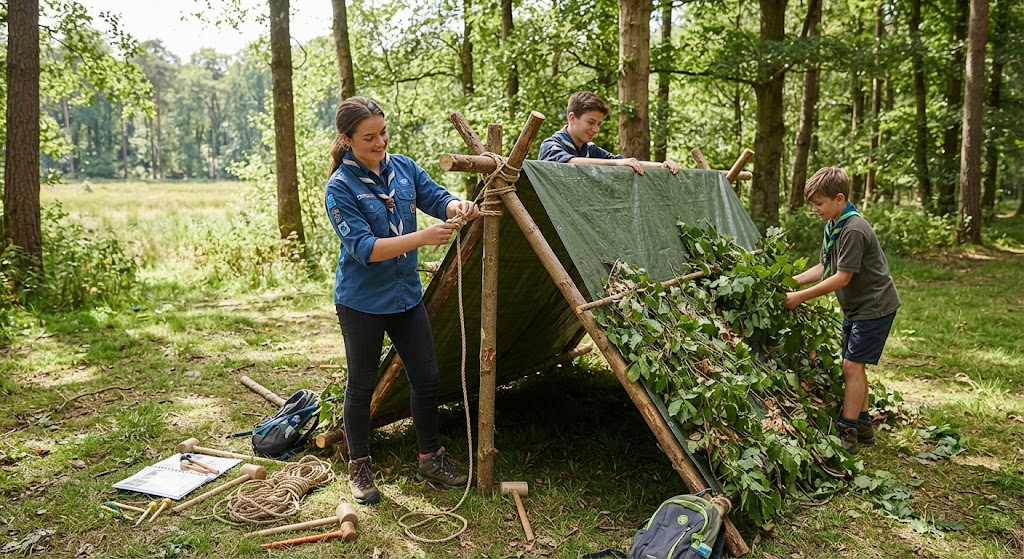
Shelter building is a great way to turn outdoor skills into a practical team activity. Scouts have to think about materials, design, stability, weather, teamwork and the needs of the person who will use the shelter.
Rather than simply asking teams to build the biggest shelter possible, give them a problem to solve. Can they create a shelter that provides protection from the weather using a limited selection of materials?
The activity can be run with natural materials, tarpaulins, ropes or a mixture of both. For younger Scouts, keep the construction simple. Older or more experienced Scouts can be given greater freedom to design their own shelter.
What Scouts Can Learn
A shelter building activity can help Scouts develop:
The activity also creates a useful opportunity to discuss why staying warm, dry and protected from the elements matters when spending time outdoors.
Activity Overview
Difficulty: Intermediate
Age: 8–18, adapted to experience
Group size: 4–30
Duration: 60–90 minutes
Location: Outdoors, with an indoor alternative
Main skills: Shelter building, planning, teamwork and outdoor awareness
For beginners, provide most of the materials and a simple design brief. Experienced Scouts can be given fewer materials and asked to develop their own solution.
Equipment
Depending on the version you choose, you may need:
If using natural materials, make sure Scouts only collect materials that are safe and appropriate to use. Don’t encourage cutting or damaging living trees and plants.
Start With a Shelter Discussion
Before building anything, ask the group what makes a good shelter.
Write their ideas down.
They might suggest:
Explain that a shelter doesn’t need to be complicated. A good design solves the problem while remaining stable and practical.
Game 1: Shelter Spotter
Before teams start building, take them around the activity area.
Ask them to identify features that could make a good or bad shelter location.
They might consider:
Don’t turn this into a real survival exercise where Scouts are expected to sleep outdoors. The purpose is to teach them how location affects shelter design.
Bring everyone back together and discuss what they noticed.
Game 2: Design Before You Build
Give each team a shelter planning sheet.
Before touching the equipment, they have to draw their proposed shelter.
Ask them to decide:
Give teams around 10 minutes to plan.
This simple stage prevents the activity from becoming a race to grab equipment and start building without thinking.
Build the Shelter
Give each team its allocated equipment.
Set a time limit, such as 25 minutes.
Teams can now turn their plans into a real structure.
Encourage Scouts to test the stability of their design as they work, but don’t allow anyone to climb on the shelters or put their weight on them.
Adults should monitor construction, particularly where poles, ropes or pegs are being used.
The aim is to build a shelter that is stable, practical and well thought out rather than simply large.
Add a Survival Scenario
Once teams understand the basic task, introduce a fictional scenario.
For example:
Your team has been caught outdoors by unexpected rain. You have limited equipment and need to create a temporary shelter that gives your team somewhere dry to regroup.
Give each team a slightly different problem.
One team might have plenty of rope but a smaller covering. Another might have a larger covering but fewer poles.
This forces Scouts to adapt their designs rather than simply copying another team.
Shelter Inspection
When the building time finishes, everyone stops.
Give teams a few minutes to inspect their own shelter before the leaders inspect it.
Ask them to consider:
The team should explain how its shelter works.
This turns the inspection into a learning exercise rather than simply declaring a winner.
Turn It Into a Team Game
If you want to add a competitive element, score the shelters across several categories.
Design: 10 points
Stability: 10 points
Weather protection: 10 points
Use of materials: 10 points
Teamwork: 10 points
Safety: 10 points
Avoid making size or speed the main scoring category.
A smaller, well-designed shelter can demonstrate much more skill than a huge structure made without much planning.
The Shelter Improvement Game
For a second round, give teams five minutes to improve their shelter.
Give them a new problem to solve.
For example:
The wind has changed direction. What could you alter?
Or:
Two more people need to use the shelter. How could you adapt it?
Teams must decide what to change without starting again from scratch.
This teaches Scouts that good outdoor skills involve adapting plans when circumstances change.
Make It More Difficult
Experienced Scouts can be given additional restrictions.
For example:
You can also give teams their materials randomly and ask them to design the best shelter possible with what they have.
The difficulty should come from the planning and problem-solving rather than introducing unnecessary physical risks.
Natural Materials Version
If you’re working somewhere suitable for it, you can introduce natural-material shelter construction.
Ask Scouts to identify suitable loose materials already on the ground.
Avoid encouraging them to cut living trees, strip bark or damage vegetation.
Set clear boundaries around what can be collected.
This version can be particularly useful for discussing resourcefulness and environmental responsibility.
Indoor Alternative
Shelter building doesn’t have to stop because of bad weather.
For an indoor session, give teams:
Ask them to create a model shelter or a full-size structure within a defined area.
You can give the same design brief as the outdoor version.
For younger Scouts, turn it into a design game where teams draw and explain their shelter rather than constructing it.
Accessibility
Shelter building naturally allows Scouts to take different roles.
Possible roles include:
Not everyone needs to carry poles or tie every knot.
Give Scouts opportunities to contribute according to their abilities and adapt the materials where necessary.
For example, lightweight materials can make construction easier, while pre-cut lengths of rope can reduce unnecessary preparation work.
Shelter Safety
Shelter construction should be carefully supervised.
Check the activity area before starting and remove obvious hazards.
Avoid unstable trees, steep slopes, water edges and areas where falling branches or other hazards could be a concern.
Keep ropes organised so they don’t create unnecessary trip hazards.
Do not allow Scouts to climb into or onto structures that have not been specifically designed and assessed for that purpose.
Don’t use heavy materials that could fall onto participants.
If pegs, mallets or other equipment are being used, demonstrate their safe use and supervise appropriately.
The finished shelter should be treated as an activity structure, not automatically as somewhere to sleep.
Safe Shelter Testing
Testing should be about evaluating the design, not testing how much weather or weight the shelter can withstand.
Once the shelters are complete, keep everyone outside the structures and inspect them from a safe distance.
Ask each team to demonstrate:
For a simple weather test, an adult can lightly spray or sprinkle water over the outside of the shelter from a safe position, provided the materials and location make this appropriate. Do not soak participants, deliberately flood the shelter or create slippery ground.
You can also use a visual wind test by placing lightweight ribbon or similar material near the shelter to help Scouts observe how air moves around the design. Don’t use fans, vehicles or other equipment to generate strong artificial wind.
What Not to Do
Don’t ask Scouts to:
A shelter built during a youth activity should be treated as a construction and learning exercise, unless it has specifically been designed, assessed and approved for overnight use.
The safest test is often simply asking Scouts to inspect their own design and explain what they would change. This develops the same planning and evaluation skills without creating unnecessary risk.
Ready-to-Run 60-Minute Session Plan
0–5 Minutes: Introduction
Explain the scenario and the objective.
Introduce the safety rules and show the equipment.
Ask Scouts what they think makes a good shelter.
5–15 Minutes: Shelter Spotter
Walk around the activity area and identify good and poor shelter locations.
Discuss wind, ground conditions, drainage and hazards.
15–25 Minutes: Design
Teams draw their shelter and decide how they will construct it.
They choose their materials and allocate team roles.
25–45 Minutes: Build
Teams construct their shelters.
Leaders circulate, answer questions and monitor safety.
Give a five-minute warning before the building period ends.
45–52 Minutes: Inspection
Teams stop building and inspect their own shelter.
Each team explains its design and the decisions it made.
Leaders then carry out a safety and design check.
52–57 Minutes: Improvement
Give teams one new problem to solve.
They have five minutes to make a useful improvement to their shelter.
57–60 Minutes: Reflection
Bring everyone together and ask:
Finish by reinforcing the importance of planning before building.
Final Thoughts
Shelter building works particularly well because Scouts can see the results of their decisions immediately.
A successful shelter requires more than tying a few ropes and throwing a covering over some poles. Teams have to think about location, weather, materials, stability and the people who will use it.
Keep the first activity simple, then introduce restrictions and unexpected problems as Scouts gain confidence.
The best shelter isn’t necessarily the biggest or fastest to build. It’s the one where the team can explain why they designed it that way and how they made it safe and practical.
🔒Ready to test your survival skills?
Join Survival Guides UK for free, complete challenges, earn badges and increase your Survival Level.
JOIN FREE →
CRAIG BURR
FOUNDER · SURVIVAL GUIDES UK
I'm Craig, the person behind Survival Guides UK. I created SGUK because I wanted somewhere people could learn real outdoor skills in a practical, straightforward way — from lighting a fire and tying knots to navigation, campcraft and everything in between.
You can read more about the story behind SGUK here as well as our approach here.