Simple Water Filter Experiment
A simple water filter is a great way to introduce Scouts and young people to filtration, layers, materials and basic water treatment. Teams build their own filter from everyday materials, pour dirty water through it and compare the results.
The experiment is easy to set up, inexpensive and works well as a short activity on its own or as part of a wider outdoor skills session.
Important: This experiment demonstrates filtration only. Filtered water must not be considered safe to drink. The activity water should be made artificially dirty rather than taken from a stream, river, pond or other natural water source.
Activity Overview
Difficulty: Beginner
Age: 7+
Group size: 2–30
Duration: 30–45 minutes
Skills: Observation, experimentation, teamwork and problem-solving
What You’ll Need
For each team:
You can also provide trays to catch spills.
Make the Dirty Water
Don’t use potentially contaminated natural water for this experiment.
Instead, make your own demonstration water by mixing clean tap water with safe materials such as:
The aim is to make the water visibly dirty without adding anything hazardous.
Avoid using bleach, cleaning products, chemicals, biological waste or anything that could make the activity water dangerous to handle.
Build the Filter
An adult should prepare the bottles if scissors or a craft knife are required.
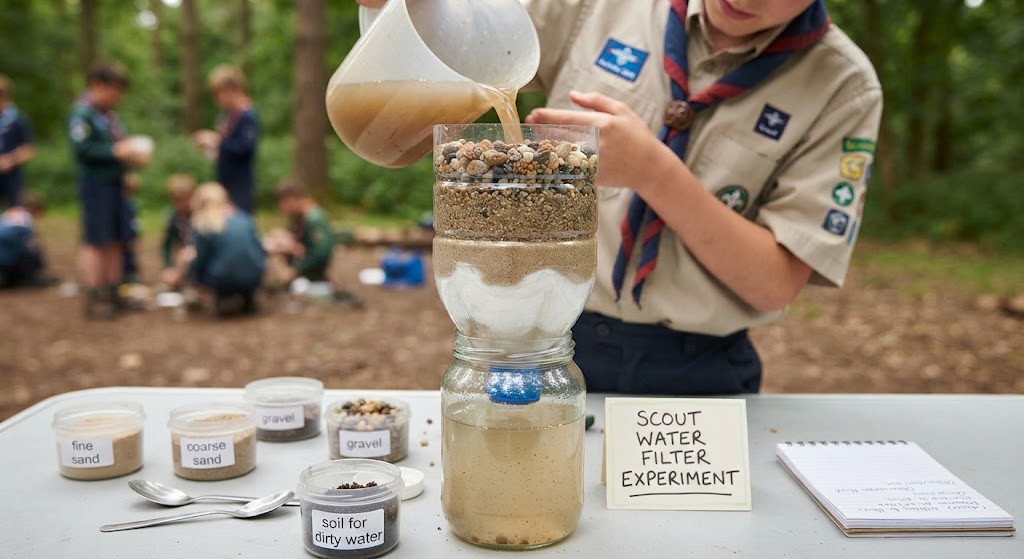
Cut the bottom from a plastic bottle and turn it upside down so the neck points towards the collection container.
Place a layer of cotton wool, coffee filter paper or clean cloth inside the neck.
Then add layers of filtering materials above it.
A simple arrangement is:
- Cotton wool or filter paper
- Fine sand
- Coarse sand
- Small gravel
Don’t worry if the layers aren’t perfect. Part of the experiment is discovering how different designs perform.
Before You Start
Show the teams the dirty water and ask them to predict what will happen.
Ask:
“What do you think the water will look like after passing through your filter?”
Then ask:
“Which material do you think will remove the most dirt?”
Encourage Scouts to make a prediction before they start. There isn’t necessarily one correct answer — the experiment is about testing their ideas.
Run the Experiment
Give each team the same amount of dirty water.
One person can slowly pour the water into the top of the filter while another holds the collection container underneath.
Watch what happens as the water moves through each layer.
Teams should look for:
Give the teams time to examine their results before changing their design.
The Filter Design Game
Now turn the experiment into a game.
Give teams a limited amount of each filtering material and challenge them to design an improved filter.
For example, each team could receive:
They must decide how to arrange their materials.
Give every team the same amount of dirty water and compare the results.
The aim isn’t simply to produce the clearest-looking water. Teams should consider both clarity and flow rate.
A filter that produces very clear water extremely slowly may have a different design from one that produces reasonably clear water quickly.
Keep Score
You can award points for different parts of the experiment.
Example scoring:
This keeps the focus on experimentation rather than simply rewarding the team with the clearest water.
Try Changing One Thing
For a second experiment, ask teams to change just one part of their filter.
For example:
Then repeat the test.
Ask:
“What changed?”
“Did your prediction come true?”
“What would you change next?”
Changing one thing at a time helps Scouts understand the basic idea of a controlled experiment.
The Water Filter Relay
For a more active version, turn the experiment into a team relay.
Place the filtering materials at one end of the activity area and the bottle and collection container at the other.
One Scout at a time collects a material and brings it back to the team.
Once all the materials have been collected, the team works together to build its filter.
Keep the relay short and avoid running around the equipment or carrying anything that could cause a trip or spill.
What Does Each Layer Do?
Use the experiment to introduce the idea that different materials can trap different-sized particles.
Gravel provides relatively large spaces and can catch larger pieces of debris.
Sand has smaller spaces and can trap finer particles.
Cotton wool or filter paper provides an even finer final layer.
This gives Scouts a simple visual example of how filtration works by physically trapping particles.
However, filtration does not remove everything that could make water unsafe.
The Most Important Lesson
Once the experiment is finished, show the teams the filtered water and ask:
“Would you drink this?”
The answer should be no.
Even if the water looks much clearer, the experiment has not made it safe to drink. Harmful microorganisms and dissolved substances may still be present.
This is an important part of the activity because clear-looking water and safe drinking water are not the same thing.
For the experiment, all water should be disposed of afterwards rather than consumed.
Make It a Survival Scenario
For older Scouts, introduce a fictional scenario:
Your team has found a muddy water source during an imaginary expedition. You need to investigate how filtration could improve the appearance of the water.
The team has a limited supply of materials and must design a filter before presenting its results.
Emphasise that this is a science experiment, not instructions for making untreated outdoor water safe to drink.
Safety
Adult supervision is recommended throughout the activity.
Take particular care when preparing plastic bottles. Scissors and craft knives should be handled by an adult or used under close supervision as appropriate for the group.
Keep the experimental water away from mouths, food and drinking bottles.
Wash hands after the activity and clean the equipment and work surfaces.
Use trays underneath the filters to catch spills and deal with wet or slippery surfaces promptly.
Do not use contaminated water, sewage, unknown chemicals or potentially hazardous materials in the experiment.
Most importantly, do not allow anyone to drink the filtered water.
Finish With a Quick Discussion
Bring everyone together and compare the filters.
Ask:
This turns a simple bottle experiment into a lesson about observation, evidence and making improvements.
Final Thoughts
The simple water filter experiment is an excellent Games & Experiments activity because Scouts can make predictions, build something, test it, compare results and then redesign it.
It also demonstrates an important scientific principle: making water look cleaner is not the same as making it safe to drink.
With a few bottles, some sand and gravel, and a little imagination, you can turn a basic experiment into a fun team activity that encourages curiosity and practical problem-solving.
🔒Ready to test your survival skills?
Join Survival Guides UK for free, complete challenges, earn badges and increase your Survival Level.
JOIN FREE →
CRAIG BURR
FOUNDER · SURVIVAL GUIDES UK
I'm Craig, the person behind Survival Guides UK. I created SGUK because I wanted somewhere people could learn real outdoor skills in a practical, straightforward way — from lighting a fire and tying knots to navigation, campcraft and everything in between.
You can read more about the story behind SGUK here as well as our approach here.